Sunday, February 26, 2012

Detailed Stats on Dwarves

[Note - this information as accurate as of posting.  A number of changes have been made since, not all of which are reflected in this post.
The following patch notes are all relevant


  • Diagonals hits are no longer penalized extra for AOE splash
  • Assault boost damage is now modified by AOE falloff
  • Increased Gunner splash damage from 50% to 66% - The gunner was lacking in ranged situations – he should be able to pack a rather large punch when upgraded with a scroll now.
  • Paladin gains a stacking 5% boost to power, defense, and resist to all allies in a 3x3 radius - Giving the Paladin an aura will help the dwarf units survive longer and deal a little more damage. The aura also works on crystals. We did this to incentivize players to move Paladins out into the field.
  • Engineer shield range up to 3 - The engineer will require less AP to maneuver and apply shields, which is a seemingly small but substantial boost.
  • Debuffs no longer apply if the target has an Engineer shield. This includes the debuffs from the Priestess and the Annihilator - The priestess will no longer be able to weaken units that have a shield on them, which is an inherent boost to the dwarves.
  • Pulverizer damage increased from 500 to 600 and now permanently removes physical armor - The Pulverizer now deals more damage and removes physical armor (non-helmets) upon hit.  This will help them to take out armored units more easily.
]

Racial Passive
  • All units get 20% additional benefit from power squares on the map.
  • You get 24% armor from a blue square
  • Red sword sSquares grants 120 damage 
  • Standing on a purple crystal increases damage done to crystals by 360.  
    • As with standard purple crystal square behavior, the bonus 360 is added as a bonus to the end of doing damage to a crystal, so dealing 5 damage to a crystal while controlling a purple square will deal 365 damage to it.
    • The 360 bonus damage is always added after all other damage calculations. So for example if the crystal has the -50% Armor debuff on it, the base damage of the attack is amplified first, and then the 360 bonus damage is added afterwards.  
    • For example, if the crystal has the armor debuff you drop a Pulverizer on it for 500 damage, you'll increase to 750 first (-50% armor) and then add 360 from owning a crystal for a total of 1110 damage.
Paladin
  • Classification: Fighter
  • Health: 1000
  • Armor: 10%
  • Magic Resist: 10%
  • Movement Speed: 2
  • Primary Attack: Melee Attack
    • Used at range 1.
    • 200 Physical damage.
  • Extra Ability: Heal
    • She always heals herself for half the amount she healed the target for
    • Heals a target for up to 400 per heal
    • Heal ignores line of sight, like all heals in the game.  So you can heal to the other side of enemy units.
    • If you are standing on a red square, you heal for 640 per cast.
    • With a Runemetal (sword) upgrade you heal 600 per cast
    • With a Runemetal upgrade while standing on a red square you heal for 960.
    • An easy way to remember this is the Paladin heals for 2x her attack.  She normally hits for 200, with Runemetal (+50% damage) it's 300, on a red square she gets +120 (dwarven bonus) so her attack is 320, and on a red square with Runemetal she hits for 480.
Grenadier
  • Classification: Caster
  • Health: 800
  • Armor: 0%
  • Magic Resist: 0%
  • Movement Speed: 2
  • Primary Attack: Grenade Toss
    • Used when the target is at range 2 or 3.  
    • Ignores line of sight (can lob grenades over enemies to targets behind)
    • Deals 200 magic damage with splash.  
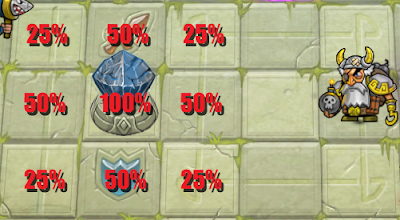
    • The AOE splash is for 50% damage to the 4 adjacent squares and 25% to the diagonal neighbors.  
    • If you increase the damage of your Grenadier via a Sword or Red Square then the Splash damage is half of the final single-target amount. 
      • For example standing on a red square increases your damage to 320, then the splash will do 160 and the corners will take 80.
  • Secondary Attack: Hook attack
    • Used when the target is at range 1.  
    • Deals 100 magical damage.
Gunner
  • Classification: Shooter
  • Health: 800
  • Armor: 0%
  • Magic Resist: 0%
  • Movement Speed: 2
  • Primary Attack: Shotgun
    • Point Blank Range
    • 300 Physical damage
  • Secondary Attack: Shotgun Spread
    • 150 Physical damage to 3 squares.  
    • Damage topology depends on which direction you are shooting 
      • North, South, East West
      • If you are shooting North, South, East or West, you can imagine that you fire a second and third bullets in the same direction down either side.  The side bullets will hit the first target they come across.  So in the above screenshot, pink targets are hit before the blue ones.
      • NE, SE, NW, SW
      • If you are shooting diagonally, then you can imagine you're firing 3 bullets in a spread, each will hit the first target it come across.  Again, pink areas are hit before the blue areas.
Engineer
  • Classification: Support
  • Health: 800
  • Armor: 0%
  • Magic Resist: 0%
  • Movement Speed: 2
  • Primary Attack: Melee
    • Used at range 1
    • 200 Physical damage
  • Extra Ability: Shield
    • Shields a unit up to 2 squares away.  
    • Can only have 1 shield active at a time. 
    • Casting a new shield removes the previous shield.  
    • Shield negates all damage from exactly 1 attack.  
    • Shield persists over multiple turns until consumed.  
    • The amount of damage done by the attack is irrelevant whether it's 5 damage from incidental splash damage or 600 damage from a scrolled Wizard.  
    • If the enemy hits a shield unit with an AOE attack, the shield will prevent the damage to the primary target but the other targets will still take the full AOE damage as though the target were not shielded.  
    • The shield protects from damage only, debuffs from the attack (such as the Annihilator's -50% physical resist debuff) will still be applied.  
    • If the Engineer is killed the shield that the Engineer had active is removed.  
    • Units can only be protected by one shield at a time
    • If a unit is already protected by a shield you cannot cast a new one on it, and you cannot "transfer ownership" of the shield from one Engineer or another (at least, none that I have found).  
    • If an attack that is shielded has a movement effect, such as the Knight's knockback or the Impaler's pull, the movement effect is also negated. 
    • Ignores line of sight (you can cast shield through enemy units)
  • Passive: Extra Power Square Bonus
    • The Engineer also receives a 40% bonus from power squares, rather than the standard Dwarven bonus of 20%.
      • This means she gets 140 damage from Red Sword squares
      • 28% Armor from Blue Squares
      • Purple squares cause 420 extra damage to be done to the enemy crystal.
  • Second Passive: Extra Cute
    • The Engineer is the cutest unit in the game
    Annihilator
    • Health: 650
    • Armor: 0%
    • Magic Resist: 0%
    • Movement Speed: 2
    • Primary Attack: Rocket Launcher
      • Up to range 3.
      • Deals 300 magic damage to the primary target and has AOE.  
      • The primary target has it's armor reduced by 50%.  
        • This is a flat 50% and allows units to go into negative armor.  
        • For example, a Void Monk (20% Armor) on a Blue Armor square (20%) who gets hit will lose 50% armor and be at -10%.  
        • The Physical armor debuff can be applied to crystals as well.  
        • The physical damage debuff applies to the next Physical attack the target takes. 
        • Negative armor means you actually take more damage.  A unit with -20% Physical Armor will take 20% more damage from the next attack.
        • The debuff will persist over multiple turns and lasts until consumed
      • All enemies neighboring the target unit are knocked back one space. 
        • If the adjacent space is occupied the knockback doesn't happen. 
        • The knockback will happen diagonally too, and the adjacent units are knocked diagonally.
      • Adjacent targets take 20% of the damage of the primary target. 
      • Diagonal targets take what appears to be 4% of the primary target, but the damage is rounded to the nearest multiple of 5


      Dwarven Brew
      • Consumable
      • Heals for 1000
      • Cannot resurrect a fallen unit
      • Grants a +50% Armor and +50% Magic Resist buff against the next attack.
      • This buff stacks linearly with any other bonuses so if you already have 20% Magic resist from a helm, you go up to70% Magic Resist
      • The buff persists until consumed
      Pulverizer
      • Deals 500 Physical damage to a single unit anywhere on the map
      • If you hit a crystal, it deals AOE damage to the units adjacent
        • Units adjacent to the crystal take 40% of the damage done the crystal.
        • Diagonal Units take 16% of the damage done to the crystal.
      • If you control a purple power square, damage to the crystal is enhanced by the Pulverizer and the splash damage is enhanced as well.
        • For example, if you have a crystal (+360) then you'll deal 860 damage per Pulverizer and deal 340 damage to adjacent units (damage numbers in Hero Academy are always rounded to the nearest 5)


      Dwarven Deck Contents
      1x Annihilator
      3x Paladin
      3x Gunner
      3x Engineer
      3x Grenadier
      3x Helm
      3x Shield
      3x Sword
      2x Scroll
      2x Dwarven Brew
      2x The Pulverizer

      Finally some closing thoughts, some interesting aspects of the Dwarves compared to the other two existing races
      • The Dwarves have no ranged stomp, unlike the Council fireball or the Dark Elf Necromancer
      • The Dwarves have no way to surprise resurrect in the field, unlike the Council potion and the Dark Elf Soul Harvest
      • While every race has a unit that does 300 Physical damage, the Dwarves deal it only at point-blank range.  So outside of their super unit, the Dwarves have trouble dealing heavy single target damage
      • Between the no ranged stomp and the lack of high single target damage, the Dwarves essentially have the hardest trouble sniping specific enemy units.
      Thanks to Jeff Gates, Travis Day and Jake Sones for helping me write this update.

      Sunday, February 19, 2012

      Tips for playing against Council with Dark Elves

      I've heard a lot of people complain that the Dark Elves are weaker than the Council.  While I tend to agree, I do not think the gap is very big.  The two races seem very well balanced against each other and I think the power gap in the races is smaller than the power gap between a good draw and a bad draw.

      So with that in mind, I thought I'd try to publish some tips for playing as Dark Elves vs. Council.  If you haven't already, I recommend the tips posted over at the James Review.

      From a big picture standpoint, the Council are more tightly bound to their roles than the Dark Elves are.

      • The Council tank is very tanky, but the Dark Elf Void Monk can do some DPS when needed.
      • The Council healer heals for more but the Dark Elf army can heal without a Priestess 
      • The Council archer does massive amounts of ranged physical damage but cannot deal damage at point blank range
      This specialization of roles is where the Council draws it's power.  If you confront a Council opponent and let them set up a formation with a frontline of Knights with Wizards and Archers behind and a Priest support, you are going to get wrecked.  The Dark Elves are not as well equipped to fight on a battlefield with 8+ unit compositions on each side.

      Although it looks fairly even, I can't help but feel I'm going to get wrecked

      Your goal as Dark Elves is to force lots of favorable unit exchanges repeatedly.  If the board gets clogged up with units, your chances of winning go down (as James illustrates nicely with his Battering Ram and Phalanx illustrations).  Not only does a clogged up board make it easier for the Council to create formations that highlight unit strengths and cover weaknesses, but the Council has better AOE damage in the form of their Fireball and Wizard.

      When playing against the Council I like to imagine a fighter in an MMA match: my opponent has longer reach, faster punches and stronger kicks - but I have a better ground game.  My goal is to bring the fight to the mat and keep it there.  My opponent is standing on two legs, and my goal as the Dark Elves is to knock out one of my opponent's legs.  I'm fairly confident if I can knock out one of those two legs without sacrificing too much in the process, I'll be in good shape. The Council's two legs are:
      1. Left Leg: Healing.  The Council is heavily dependent on the 3 priests for healing.
      2. Right Leg: Physical damage.  The council army has 3 sources of physical damage, of which only the 3 Archers and the Ninja matter. (Let's face it, the 3 Knights are pretty bad at dealing damage)
      This leads to two obvious approaches

      Approach #1: Kill the enemy priests.
      If you are going down this road you want to suicide your units to take out enemy priests.  Remember that priests can't heal themselves, so if your opponent has only a single priest on the table, it's okay to take a priest low, or fail to stomp her.  Granted, your opponent might have a potion in hand or a priest in reserve, but I can't tell you how many times I've charged a priest with my void monk for 600 damage, and managed to kill the priest on a following turn.  The risk is worth the reward: kill priests with extreme prejudice.
      Tips for approach 1
      • If there are no priests on the board, play a slightly conservative game but keep pressure on.  If both players are running back and forth plinking at their opponents the Dark Elves will win due to their life leech.  Doing light and consistent damage to your opponent will probably draw out any priests that are sitting in hand. 
      • Watch for your opponent swapping tiles or excessive upgrade usage.  Good Council players are more comfortable when there are two priests on the board.  Tile swapping or sub-optimal plays may be priest-fishing if your opponent hasn't placed two yet.
      • Be far more aggressive when there is only a single priest on the board.  Much like rabbits, priests need population control.  Beat on them when there's only one.  Once there's two priests the job is much harder.
      • Save your scrolls for two priest, or stomp situations.  Your deck has two scrolls, they have 3 priests.  In a perfect world each scroll translates into a priest kill + stomp.  This leaves a 3rd priest who can be slowly killed at a convenient rate since priests can't heal themselves.  If you manage to kill a priest without a scroll, then you can use your scroll elsewhere.
      Approach #2: Kill the enemy Ninja and Archers.
      Approach #2 is harder to pull off than Approach #1 but in my experience has a higher rate of success once you've attained it.  Your end-game plan is to use either a fully upgraded Wraith of a fully upgraded Void Monk to make life miserable for your opponent.  If you have a fully upgraded Wraith and you've killed the enemy Archers and Ninja's you've pretty much guaranteed a win.  A fully upgraded Void Monk will need a little bit of careful management but will still be extremely difficult for your opponent to deal with.

      Note that fully upgraded means
      • Sword
      • Leech Gem
      • Helm
      • +50 Health from Potion
      • +Health from Soul Harvest if available
      Here's a game I recently had.  My opponent lost all 3 archers and his Ninja.  I had lost everything on the board to get to this state except for my lone Wraith and 7 cards left in my deck.
      Wraith: "Don't worry guys, I got this"
      My opponent used 2 turns to set up further while I put a priestess on the board for safety.
      Priestess is positioned in range to heal the Wraith while standing on Armor buff square

      My opponent's fully geared Knight is a concern, and I need to make sure I don't get cornered.

      I use my scroll to take out the full geared Knight,

      Ultimately, a few turns later, my opponent concedes, realizing that with only Knights, Priests and Wizards, there's no way for him to kill the Wraith.

      Without a Ninja, archers, and assuming you don't stand in a corner next to a Knight, here are some facts to consider about our lovely Wraith

      • If your Wraith swings just twice a turn he'll deal up to 1200 damage.  Usually you'll do less because of overkill - absolutely conservatively you'll deal 800 to kill a unit. This means you'll leech ~534 damage minimum without even trying.  If you manage to deal 1200 or even 1800 damage you'll be leeching 800-1200 health.  
      • A Wizard using all 5 attacks on the Wraith will only deal 700 damage.
      • A Wizard with a sword or standing on a red quare, using all 5 attacks will deal 1050 damage - still not enough to kill a Wraith.
      • A Wizard who Equips a weapon and then uses a scroll, followed by 3 attacks in a row is still only going to cause 1050 damage
      • A Wizard with a weapon and using a scroll plus 4 attacks deals 1260 damage - still not enough to kill the Wraith!
      • A Wizard using a weapon and standing on a red square will deal 1575 damage. This is finally enough  to kill a Wraith but doensn't have an action left to stomp!  so with a Priestiess or Soul Harvest handy you can easily recover.
      • A Wizard using a weapon, standing on a red square, and using a scroll can deal the 1575 damage and stomp.
      • What this means is that, assuming you Wraith is at full health, the only thing you have to worry about is a Wizard, with a weapon, standing on a red square.  And even then if your opponent has used both scrolls and you have a Soul Harvest in hand you're still safe.  A Wizard standing on a red square is ridiculously easy to deal with too, just don't end your turn within range of him.
      • Generally speaking as long as you don't end your turn within range of a red square or backed into a corner where a Knight can attack your Wraith is going to solo their entire team.

      If you don't have a Wraith available, a Void Monk can sometimes do the job too.  The Monk may not have as much health, but he has 40% Magic Resist and 20% Physical Resist when upgraded.  This means the Monk can take on any non-upgraded unit

      • Damage the Monk will take: 160 per attack from Physical, 120 per attack from Magical
      • Health the Monk will leech with gem: 200 per attack against unarmored foes, 160 per attack against 20% resistant armored foes.
      As you can see, while the Void Monk can't lock up a game quite the way a Wraith can, he can very often lock up the game enough to secure a win.

      So how badly should you try to kill Council Priests and Archers?  While there are no firm rules - it always depends on the current game state - here are some general guidelines
      • I will happily trade any non-Wrath unit without upgrades for an enemy Archer or Priest any day of the week and twice on Sundays. When an opponent  presents an Archer or Priest to me for trade it feels like Christmas.
      • I will trade any non-Wraith unit with a weapon upgrade to get my second priest kill (because you know after you've killed the second priest, the third one will fall easily due to the inability to heal herself).
      • I will trade any non-Wraith unit with 2 upgrades to kill an archer with a weapon upgrade.  
      • I typically save scrolls to kill either a priest, an archer with a weapon upgrade, or a Ninja
      Finally to close, here are some tips for actually killing those enemy priests and archers in games against more experienced opponents who are doing a good job protecting their squishies.
      • Watch for lone priests and archers in the early game.  There are lots of games where after the first 1-2 rounds of setup, I'll run straight across the board with a Void Monk or an Impaler at the enemy priest.
      • If the board is starting to stall out but you see a priest that you think could be weak, push forward with 3 units at once.  Your opponent will kill one of your units leaving 2 units in striking range.  At that point you're trying to get a 3 for 2 trade.  It's not as ideal but against good opponent's it's often the best you can do.
      • Sometimes the board is so clogged you have to pre-scroll.  Pre-scrolling a weapon'ed necromancer is usually enough to take out a priest or archer that's only moderately protected. Don't be afraid to sacrifice a void monk to get your damage closer.  If you're getting desperate, try moving your impaler or necromancer a little closer than usual, but place a void monk in front for protection such that the Void Monk might die, but your damage unit will nab the target.
      Hope those tips help!  All the best!


      Sunday, February 12, 2012

      Design Stab at Hero Academy Dwarves

      Robot Entertainment is scheduled to release a third race in the future: the "Dwarves".  You can see a very short preview at the end of their Master Class video.

      I thought it would be fun to take a stab at designing out the units.

      Caveat: This is not the official design!  This is a completely independent take on the units based on the concept art.  It's just random ramblings I thought would be cool.

      Here's the concept art screenshot they provide at the end of the video.


      As I documented in my previous post, each of the existing races follows a specific pattern.  For the purposes of this exercise I'm going to assume that Robot wants to stick to this general pattern.  I'm going to reiterate, I have no idea what the actual design is, I'm just making this up for fun because I love the game and I like designing stuff.

      So the first observation is that there are 7 units depicted, but each race only has 5 units.  This has 3 possibilities
      • The dwarves have more than 5 units
      • This is just concept art for unit ideas, but not all of them made the cut
      • Some of the units depicted are "upgraded" versions
      I'm going to assume the third.  Obviously the two on the right are the same unit.  I'm going to pretend that the top two middle units (the two ranged shooters) are actually the same unit and I'm also going to assume that the two on the bottom middle are the same unit too.

      Based on the art, I'm thinking there is the standard +20% Magic Resist magic helm.  As a racial specific upgrade, I'm giving the Dwarves a +1 range upgrade.

      Here is my design stab:

      # Name PicHealthArmorMRMoveRangeDamageSpecial
      1 Mountain Giant

      1200 20% 20% 1 1 400 Phys Enemies hit by the Mountain Giant are stunned, and cannot perform any action next turn
      3 Berserker   1000 20% 0% 2 1 300 Phys
      3 Rifleman 800 20% 0% 2 3 200 Phys Deals 100 splash damage to enemies adjacent to the target square.
      3 Sapper 800 20% 0% 3 2 200 Magic If killed, explodes for 200 damage to adjacent enemies
      3 Valkyrie 800 20% 0% 2 2 200 Magic Can heal for 450, 2 square range
      2 Grog Heals 1000 Life or revives a unit.  Also permanently increases the unit's damage by 50
      2 Scroll 3x damage on next attack
      2 Oktoberfest

      Deal 350 Damage to enemies and heal allies for 350 Life in a 3x3 area.
      3 Sword Adds +50% Attack
      3 Helm Adds 10% health and 20% Magic Resist
      3 Range Upgrade
      Equipped unit has +1 Range

      A few notes.

      First, I gave the dwarves 20% inherent physical resist on every unit.  The Dark Elves have life leech, and the humans have priests that heal for extra large amounts.  At the same time  think 20% inherent physical resist on all units is probably strong, so I tried to compensate by making the healer range 2, and only heal for 450 (50 more than a Dark Elf Priestess I think?).

      The other big thing is the range upgrade!  I figured the Warrior with the range upgrade would get a throwing axe.  The Rifleman could also get a range upgrade. Normally already range 3, with the range upgrade he would be range 4.

      Some other ideas I had.  Thought maybe the dwarves could have passive life regen as a passive rather than phys armor, but regen might best be saved for a future race like trolls or undead.  I had an idea that the Mountain giant was beefier and could move 2 but could only be given one move command a turn.  I originally had it that the 3x3 bomb dealt damage and reduced the armor and magic resist of enemies int the area to 0 for the remainder of the current turn, but I thought that might be too mathy.

      Can't wait to see what the real Dwarves look like for real!

      Edit #1: Jeff G. mentioned that there should be some AOE damage and the Rifleman paralled the Archer too much and I agreed.  Changed Rifleman from 300=>200 damage but gave the Rifleman splash damage.  But that left the Dwarves without a 300 damage unit, which I gave to the Warrior, and renamed him a "Berserker".  That actually struck me as really good, as a differentiating point for the Dwarven race.

      Saturday, February 4, 2012

      Hero Academy Deck Contents

      Ever wonder what the Hero Academy army compositions were? Jake and I sat down and determined the contents of the Hero Academy decks.

      Each Army consists of:

      Council
      1x Ninja
      3x Knight
      3x Archer
      3x Wizard
      3x Cleric

      3x Helm
      3x Shield
      3x Sword

      2x Potion
      2x Scroll
      2x Inferno

      Dark Elves
      1x Wraith
      3x Void Monk
      3x Impaler
      3x Necromancer
      3x Priestess

      3x Helm
      3x Soulstone
      3x Sword

      2x Mana Vial
      2x Scroll
      2x Soul Harvest

      Dwarves (edit 2/24/2012 for Dwarves)

      1x Annihilator
      3x Paladin
      3x Gunner
      3x Grenadier
      3x Engineer

      3x Helm
      3x Shield
      3x Sword

      2x Dwarven Brew
      2x Scroll
      2x The Pulverizer


      Tribe (edit 4/8/2012 for Tribe)
      2x Chieftain
      3x Warrior
      3x Axe Thrower
      3x Witch
      3x Shaman

      4x Spike Armor
      3x Runemetal

      4x Haunch of Meat
      3x Typhoon


      This information can be useful when you're deciding how aggressive to be.  The problem is that the game doesn't provide any built-in log.  What's a person to do?  Keeping a separate log of the game state of every game seems like too much work, but at the same time, knowing that your enemy has used up both Scrolls and both Inferno's can be extremely valuable tactical information.

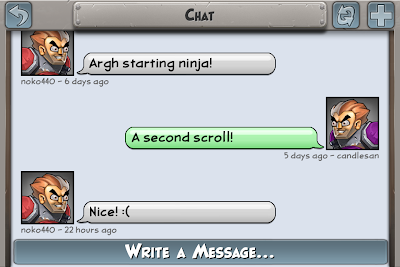
      Ideally, Robot would add some sort of combat log or a Deck Contents viewer to the side, but in the meantime I've been using the chat log as a makeshift recorder of important events.  In particular I want to track my opponent's scrolls and fireballs.  The chat log is integrated, attached to each game, and always available.  To be sneaky though, I've been disguising my log as friendly messages to my opponent.  Ha ha!  Check out these screens:


      As you can see, my combat log of my opponent's specials are cleverly disguised as congratulatory messages!
      On a serious note though, if you're in a game with me and you've read this, we can just start recording important events and not make a big fuss.